|
| Overview | All Modules | Tutorial | User's Guide | Programming Guide |
| Previous | COVISE Online Documentation | Next |
Usage Hints:
This short introduction has been prepared for users with basic experience in using COVISE VR in a standalone environment only; for this user group it provides the necessary background to extend the use of COVISE to Collaborative Engineering, i.e. COVISE CE. The information has been collected from the Tutorial, the first chapters of the (old) User's Guide, and other sources to provide one reference chapter for these users.
For collaborative working you can either use COVISE CE alone - as described in this document - or you can extend a collaborative COVISE session to a complete (virtual) meeting, using N'S³ (COVISE Conference Room Interface). The Conference Room Interface (optional feature, described in a separate document)
Architectural Concepts:
For collaborative working with COVISE you should know the basic architectural concepts of COVISE. After having read this chapter you will be familiar with:
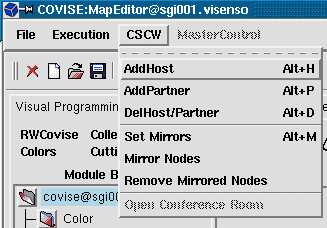
In COVISE it is possible to run modules on remote computers. This is also known as "Distributed Computing". By distributing modules across a network one can make use of remote resources for example of a compute server with more CPUs or memory than on a local workstation or PC. The COVISE session is controlled from the Mapeditor on the local workstation. Remote hosts are included in the session via the menu item CSCW > > AddHost (CSCW = Computer Supported Collaborative Work).
In a multiuser session each participant has his own Mapeditor and Renderer. The session has to be initiated by one partner who adds the other partners to the session (menu item CSCW > > AddPartner). The initiating partner plays the master role, which means that he has the control over the Mapeditor and the Renderer. If he e.g. changes the camera position in the Renderer all other partner's cameras are synchronised with the master camera. The master role can be exchanged between partners. This way of working together in a multiuser session is also known as "Collaborative Working" or - for COVISE applications - as "Collaborative Engineering" where COVISE is regarded as a "Shared Application" which is aware of the sharing.
As the hosts of the partners can also be used for distributed computing COVISE extends far beyond a "Shared Application" such as the ones based on X Windows sharing or a Windows application shared via Netmeeting.
The next sections provide background information on the COVISE architecture and explain how a distributed session (Distributed Computing) or a collaborative session (for Collaborative Engineering) is implemented.
|
See also: Additional feature COVISE daemon "covised": The COVISE daemon "covised" - included as a preversion in Rel. 5.2 - provides a more general and more comfortable user interface for collaborative working than CSCW, using a concept of "rooms" (working groups - can be predefined) like N'S³ (see 5.6 New Collaborative COVISE) |
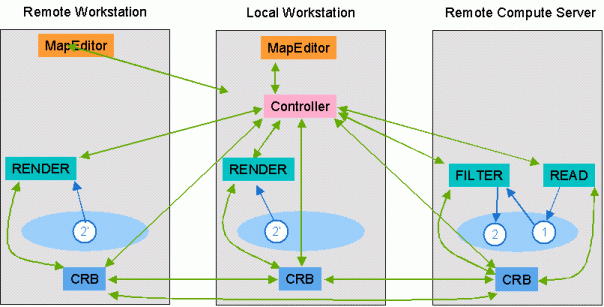
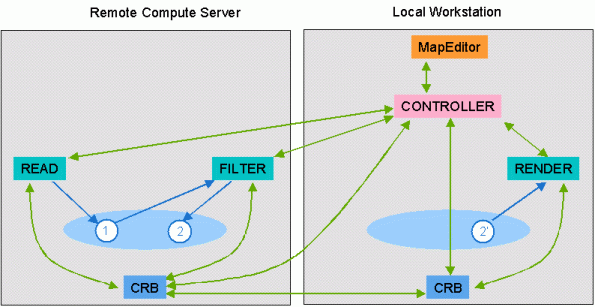
In COVISE it is possible to run modules on remote computers. This is also known as Distributed Computing. By distributing modules across a network remote resources are used for example of a compute server with more CPUs or memory than o<Zwischenablage leer>n your local workstation or PC. The COVISE session is controlled from the MapEditor on the local workstation.
Figure 5.1: Distributed Session (Distributed Computing)
When the module map is executed the Controller sends a start message to the remote read module. The read module reads in the data file and creates a COVISE data object (1) in shared memory and after processing tells the Controller that the module has finished. The Controller informs the filter module on the remote computer to start. The filter module asks its data management process (CRB) for the data object (1). The filter module now reads that data object, computes something and puts the data object (2) into shared memory. It then tells the Controller that it has finished. The Controller informs the renderer module to start. The renderer asks the CRB for object (2) and as this object is not available on the local workstations the CRB transfers it from the compute server into the shared memory of the local workstation (2'). Now the renderer can access this object and display the data.
In a multiuser session each participant has it's own MapEditor and Renderer. The session has to be initiated by one partner who adds the other partners to the session. The initiating partner plays the master role, which means that he has the control over the MapEditor and the Renderer. If he e.g. changes the camera position in the Renderer all other partner's cameras are synchronised with the master camera. The master role can be exchanged between partners. This way of working together in a multiuser session is also known as Collaborative Working / Collaborative Engineering. The hosts of the partners can also be used for distributed computing.
Figure 5.2: Collaborative Session (Collaborative Engineering in COVISE CE))
|
See also: Additional feature COVISE daemon "covised": The COVISE daemon "covised" - included as a preversion in Rel. 5.2 - provides a more general and more comfortable user interface for collaborative working than CSCW, using a concept of "rooms" (working groups - can be predefined) like N'S³ (see 5.6 New Collaborative COVISE) |
Every computer that will participate in a distributed or collaborative session should be included in the section HostConfig in the file covise.config. For each host you have to specify the memory model for data exchange between modules on the local machine, the execution mode and a timeout for TCP connections.
HostConfig
{
    # Hostname MemoryModel ExecutionMode Timeout
    vista       shm        rexec       30
    visit       shm        rexec       30
}
For workstations and PCs the memory model is shm which stands for shared memory. There are other memory models like none specifically for machines such as CRAY Y-MP computers.
The execution mode specifies the command which should be used to start the CRB on the remote computer. Possible execution modes are:
For all execution modes besides manual one needs access to the account on the remote computer. For rexec one has to enter the hostname, the user id and the password on the remote machine (similar to logging in on the remote computer using telnet). rsh and ssh can only be used if they allow to log in without password specification (see man rsh and ssh for the files where allowed users are specified). nqs is not recommended, it can be used to put the CRB into a batch queue. Manual means that one has to start the CRB process manually on the remote machine. This can be useful for sessions across a firewall or if one doesn't have access to the remote account. In this case COVISE shows a command in the window where COVISE was started.
The time-out value specifies how many seconds a process will wait to be contacted by a new process that he initiated (e.g. the Controller waiting for a module). The default value is 5 seconds. For slow networks a time-out of 30 seconds is useful. For very slow networks even a higher value is recommended.
As shown in Figure 5.2 COVISE uses TCP sockets for communication with remote hosts. A socket is defined by an IP address, a port number and the protocol (here tcp). COVISE port numbers start by default at 31000. One can configure the start number in the file covise.config using the keyword COVISE_PORT in the section network:
Network
{
    COVISE_PORT     5000
}
For collaborative or distributed sessions across firewalls the firewall has to allow tcp connections to ports in both directions starting with the number defined in covise.config. You need as many ports as modules started during the whole session +3 for distributed sessions or + 4 for collaborative sessions (if you load several maps in a session each map needs new ports). Depending on the execution mode the ports for rexec, rsh or ssh have to be allowed. For the execution mode manual no extra port is required.
Note:
If you use IP forwarding from your firewall to your local computer you have to make additional configurations. Every host that wants to connect to your session has to know that you are behind a firewall and use IP forwarding. Therefore you can tell COVISE not to connect to your machine but to your firewall instead. This is done by adding an IP_ALIAS entry on every client side. Assume your IP is 192.168.0.15 and your firewall has the IP 133.168.226.234 from the outside. Then you have to add
Network {
   IP_ALIAS    192.168.0.15    133.168.226.234
   #           <your IP>       <your firewall IP> =

}
to the config file on every host you want to connect to.
After having read this section you will be familiar with:
|
See also: Additional feature COVISE daemon "covised": The COVISE daemon "covised" - included as a preversion in Rel. 5.2 - provides a more general and more comfortable user interface for collaborative working than CSCW, using a concept of "rooms" (working groups - can be predefined) like N'S³ (see 5.6 New Collaborative COVISE) |
Notes:
Figure 5.3: Hosts(CSCW) Menu
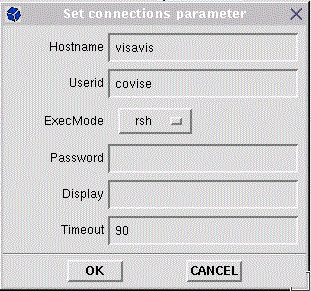
The window in Figure 5.4 will pop up. First select a hostname or enter a new one. .gif If the selected hostname is available, the window in Figure 5.5 will appear. You can select the parameters for a connection.
Depending on the configuration parameters in covise.config the execution model and the time-out are adjusted. Now one can change the time-out and the execution mode if other values than the standard are required.
For execution mode rexec the user id and password on the remote computer has to be entered. For execution mode rsh or ssh only the user id is needed
In the manual execution mode COVISE writes a message in the window saying how COVISE should be started on the remote computer. It looks like
   start "crb 31005 129.69.29.12 1005" on
   visit.rus.uni-stuttgart.de
Figure 5.5: Set Connection Parameters
crb 31005 129.69.29.12 1005
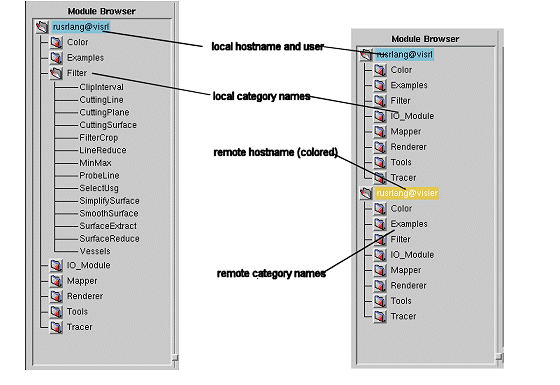
When the remote host is successfully added, the remote username and hostname will appear in the list of hostnames of the Module Browser. Depending on the specification in the scope UIConfig of the config.file , the new host and his modules are shown either in another color or have the hostname in their label. Here the option is used that hosts are shown colored(see Figure 2.4). When the remote computer is added successfully the remote username and hostname will appear in the module browser list (see Figure 2.4). Here the option is used that hosts are shown colored.
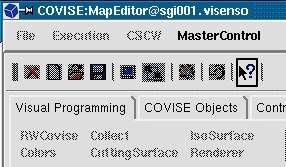
Figure 5.6: Module Browser Windows for Local and Distributed/Collaborative Working
Figure 5.7: Module Map for Local and Distributed/Collaborative Working
When selecting the remote computer in the hosts list the categories and modules available on this computer will be offered. Clicking on a module it is started on the remote computer. This is indicated by the hostname in front of the module name (Figure 2.5), if the hosts are not colored.
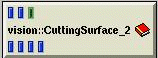
Figure 5.8: Icon for a Remote Module
When a map is saved (menu File > > Save) the information about the hostname is saved, too. When a map is loaded which was saved including remote modules one is asked to add the remote hosts first
After having read this chapter you will be familiar with:
CSCW > > AddPartner includes the remote host in the session and starts a Mapeditor on the remote machine. Except for the renderers all other modules are started on the computer which was selected in the hosts list. Renderer modules are started on all workstations.
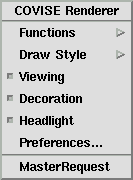
The partner who initiated the session initially has the master role. He can load maps or start modules and connect them. He also controls the renderers. The slave partners can watch all actions of the master but all menu items besides the menu master and interaction in the Mapeditor are deactivated. This is indicated by grey text on the menu buttons and in the modules. The slave partners can request the master role using the menu MasterControl > > Request (or use the corresponing item "MasterRequest" of the Viewer Popup Menu in the Renderer). Fig. 5.9 and 5.10 below show both possibilities.
Figure 5.9: MasterControl from MapEditor
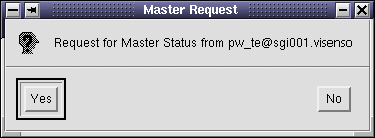
If you click on MasterCtrl, a question dialog (Figure 5.11) pops up on the master computer:
Figure 5.11: Master Request Window
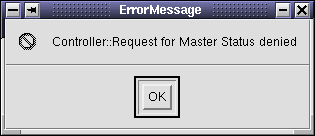
Figure 5.12: Negative Response
This applies not only to the Mapeditor menu but also to the parameter entries in Module Info and Control Panel window - but please note the following restrictions for scalar/slider parameters if their appearance type has been changed to "player"/"sequencer":
The slave Renderers are synchronised with the master renderer which means that all manipulation actions like changing the camera position, zooming, selecting objects etc. are sent to the slave Renderers. As long as the master doesn't do anything in the Renderer the slave Renderers can be used independently.
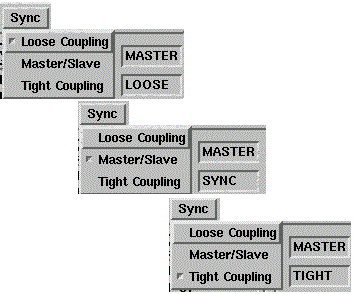
Depending on the line speed of your connection, you can choose your adequate level of synchronization (see Fig. 5.13); use LOOSE coupling if you have a slow connection.
Figure 5.13: Increasing levels of Synchronization
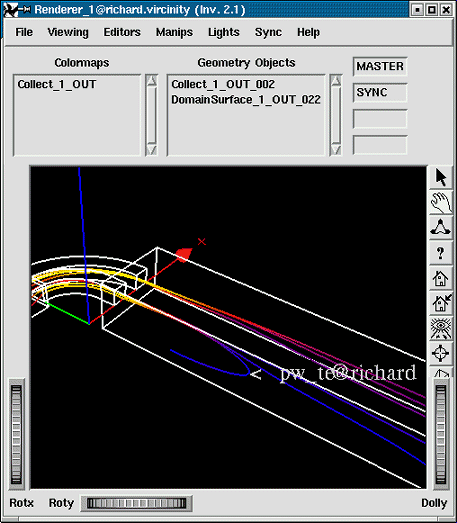
One can make his own mouse pointer visible for the partners by pressing the SHIFT key and moving the mouse. This functionality is called Telepointer. In all remote renderers the originating hostname appears at the position pointed at (Figure 3.5). This also works for Renderer windows having different sizes as the position in 3D space is transmitted and not the 2D pixel coordinates.
Figure 5.14 shows a snapshot from a collaborative session. The user pw_te on host richard.visenso.de uses the telepointer to show the other user(s) the backflow zone in a channel.
Figure 5.14: Telepointer in the Renderer
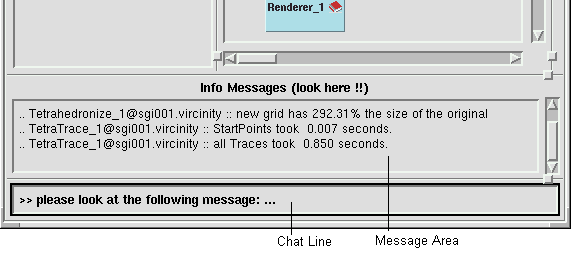
Figure 5.15: Message Area and Chat Line
>> hostname >> Text
The telepointer is operating in all directions. If you press the SHIFT key on your keyboard, your machine's name will appear at your current mouse position in the other renderer's drawing areas. To reposition the telepointer to another position, release the SHIFT key, move the mouse and press SHIFT again at the new position, or move the mouse while the SHIFT key is still pressed. The difference here is, that in the second case the new mouse position is sent over the network very often.
Normally, new positional information is only sent, when the master releases the mouse button in the viewer area.
The same is true for the thumb wheels and the slider around the viewer. When you release the mouse button information is sent over the network.
As far as the sliders in the transform editor are concerned, the situation is somewhat different. If you are using the transform sliders by pressing the mouse button and moving back and forth, every little movement will directly go over the network. If you want to avoid this, click on the slider once at the desired position or use the input line. Note that renderers running on machines without advanced graphics hardware can manually change the scene drawstyle changed to wireframe or points for locally doing extensive editing operations. This especially applies to the master/slave mode.
After reading this chapter you will be able to work with a "mirror" of your map.
The main purpose of mirroring is to show a map in a slave without copying huge amounts of input data.
COVISE allows you to "mirror" a whole pipeline (also distributed) or parts of it completely to another host (and to delete it):
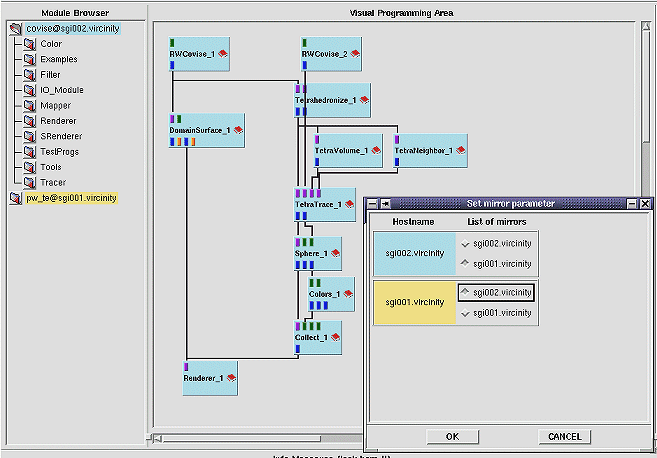
In order to Set Mirrors, you should have added at least one partner/host; in case of the example below you are working as user "covise@sgi002.vircinity.de" and you have added "pw_te@sgi001.vircinity.de" as a partner. You can specify now sgi001.vircinity.de as mirror of sgi002.vircinity.de (and sgi002.vircinity.de as mirror of sgi001.vircinity.de).
Figure 5.16: Set Mirrors
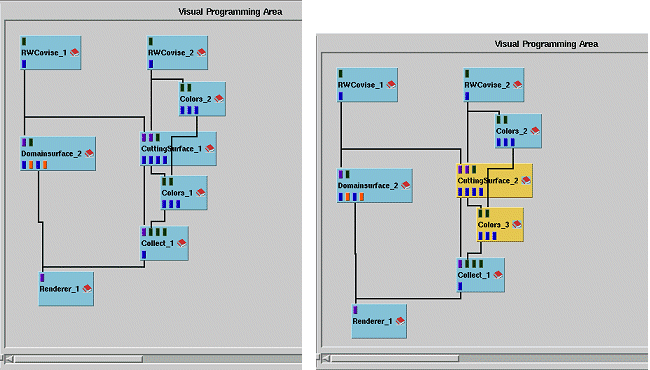
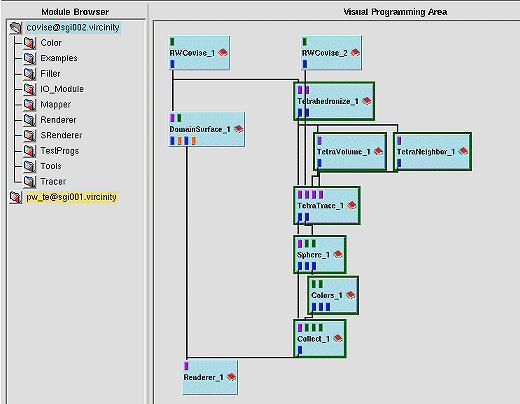
If you have set mirrors, you can issue Mirror Nodes in order to mirror either a complete map (default) or a selected group of nodes.
Figure 5.17: Mark nodes to be mirrored (default: complete map)
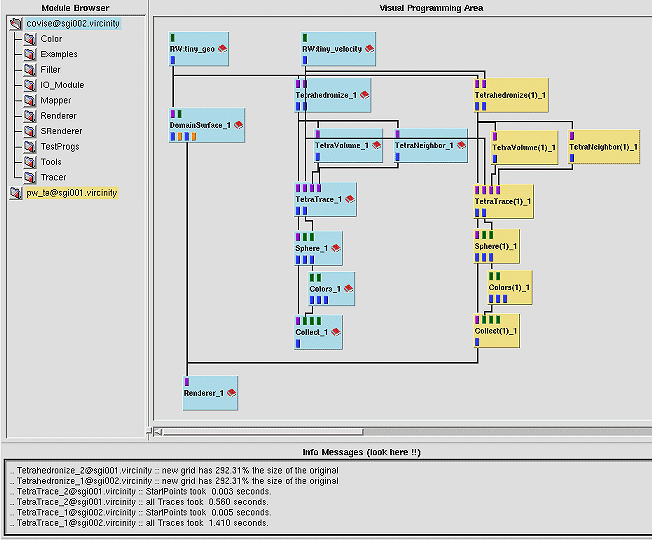
Now you can mirror the selected nodes (shown in yellow) and compare e.g. execution times of original and mirrored modules. In the example below you see that the mirrored modules run faster, so you might choose to change your map accordingly.
Figure 5.18: Mirror Nodes (and compare execution times)
Delete Mirrored Nodes is just the inverse operation of Mirror Node, i.e. it removes the mirrored nodes and leaves your original map unchanged.
The advantage of mirroring modules to your partner's host is that you save the time of transferring the whole visualization data every time the object changes. Changing the camera position in the renderer doesn't change the visualization data itself. Therefore if you only use functions of the Renderer, the visualization data will not be transferred multiple times. You don't need the Mirror mode feature in this case. But if you really want to change the visualization data during the session you should use this mode. For example if you want to change the data mapped on the surface from temperature to pressure you can take advantage of the mirror mode.
Suppose you want to share the visualization of a crash with your partner. The data has 53 time steps and the whole data size including all these time steps is 20MB. It was computed with 54.800 elements. Assume you use an ISDN line and can transfer 8kB/s data in average. Then it takes around 43 minutes to transfer the data to your partner.
You are in the session now and you want perhaps just change the color map of your visualization to analyse a certain range of values. Do you really want to wait 43 minutes before you can continue the meeting?
The mirror mode solves this problem in the following way: You have to tranfer once your data to your partner's side. Every execution you do on your side is also done on your partner's machine. Therefore no visualization data has to be transferred. All changes are updated on both sides independently. You can see the status of execution on your partner's side in the Mapeditor.
NOTE: The path- and filenames of your data have to be identical on every machine! The easiest way to create this scenario is to put the data in your COVISE directory. All modules of COVISE allow the usage of path names that are relative the current COVISE directory.
This chapter introduces a new concept of Collaborative COVISE that is more general and more flexible than using the CSCW operations AddPartner etc.
COVISE Rel. 5.2 provides a first implementation of this approach -
- use this preversion at your own risk.
Section 1 is a concept paper about this approach that provides the necessary background even if it might be obsolete in some details.
Section 2 shows you the implementation (your actual view might be slightly different).
Section 3 provides you the actual information to use the COVISE daemon "covised".
The goal of this project is to improve the way of using COVISE in collaborative mode and provides the following features:
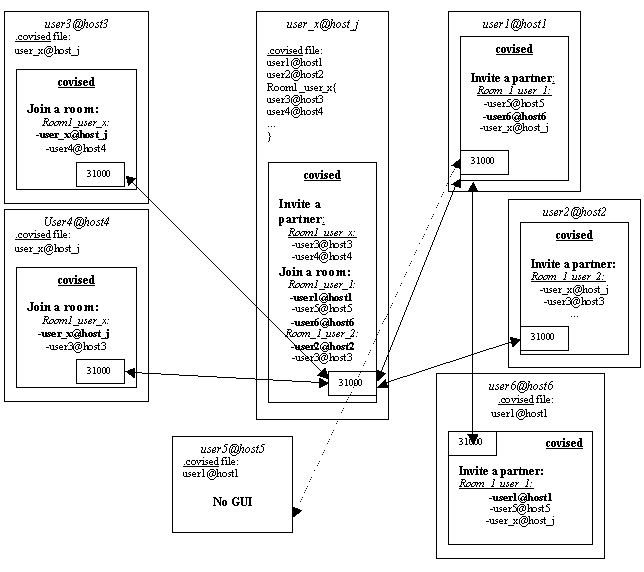
The management of the participants and conference rooms is done by a special application named "covised" (COVISE daemon). It can launched by every user and can be configured to run with or without user interface. Every daemon reads from a configuration file (.covised) a list of users he is interested in (masters list) and a list of predefined rooms. A room is a list of potential partners and is directly related to the user who created it (the master of the room) . It can be private (only the name of the room is propagated to the members ), normal (the members are propagated but only inside the room - only this version is currently implemented) or public (the name of the members and the name of the room are propagated to everybody who asks).
Example of .covised file for user_x@host_j:

#Masters_list
  user1@host1
  user2@host2
   ...

#Rooms_list
Room1_user_x{
  user3@host3
  user4@host4
  user4@computeServer  host  "ssh hwwo2k 'covised -host user_x@host_j'"
  ...
 }
When the covised is launched it tries to establish first the connections with every user of his masters list. Some of them are already connected and ready to inform him about the rooms where they take part (entire list of potential participants and those who already work together with a different color). If there are some predefined rooms in his list (he is the master), the application will try to connect to all potential members of the room(s) and if they run covised and he is included in their masters list, a (info) connection will be established and the information about rooms will be sent.
Figure 5.19: Concept of Collaborative COVISE
A special situation is with the user5 who does not not have an user interface. In this case he will try to connect to user1 (read from .covised) and will become automatically an active member of the rooms which are defined by user1 (Room_1_user_1) and include him as member.
The non-GUI covised will also be used if there is a firewall between host1 and host5, for example, and host5 can be used as "host". user1 opens a secure shell (ssh) on host5, launches covised without GUI but with an argument "-host". The connection between daemons will be done and a COVISE session will add automatically user5 as "host". If the host is defined in the .covised file, the daemon could also be started automatically by a command in the file as shown in the example file for user4@computeServer.
But the final goal of the users is to have a collaborative COVISE session. It will be launched by the master (does not matter the number of active members), which will press a button attached to the room. The controller, crb and MapEditor will be launched and if there are already some active members, a crb command will be generated (as in manual "AddPartner") and will be transmitted through the directly opened connection to their covised, which will launch the crb, and everything will work as in old collaborative covise. As soon as there are new active members they will be added automatically as partners.
An active member can quit by asking the master or can be eliminated by him. An automatic "remove partner" will be done in the COVISE session, but the connection will be kept because he is still a passive member. An exit from collab_covise will also close the connection. For detecting crashes, there will be an exchange of messages between the master and slaves every 30s.
If there is more than one user on the same machine running covised, the usage of a fix port (31000) is not sufficient. The first process, which accepts connections on 31000, will route, in this case all, messages between other users and their partners. If a new user on the same machine launches covised, it will connect to 31000 for sending or receiving messages to or from outside through the first user.
If the first user terminates covised or crashes, his role should be taken by another daemon of another user. For doing that, there will be a priority list (FIFO principle) which will be sent to all local users. When the "owner" of 31000 will exit, the first in the list will listen to 31000 and the others will connect there.
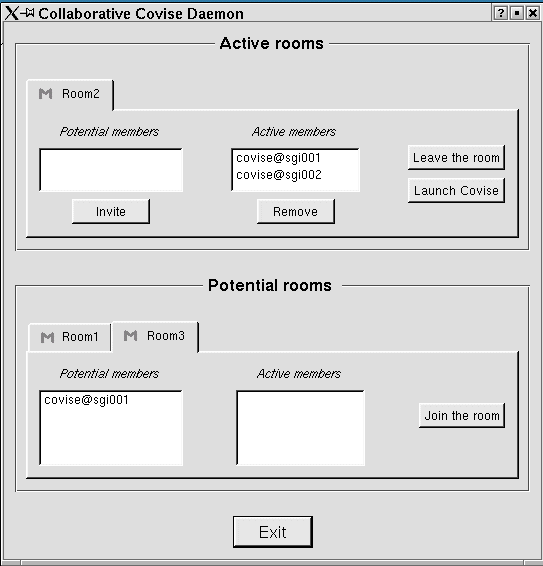
The pictures below show you an example of the implementation of Collaborative COVISE with "covised" (Your actual view might slightly differ from the images shown below).
There are 2 members
 covise@sgi001
 covise@sgi001
and the following configuration of rooms
active: Room 2 - Master: active members covise@sgi001 and covise@sgi002
potential: (Room 1 - Master)
Room 3 - Master: potential member covise@sgi001
(see Fig. 5.20)
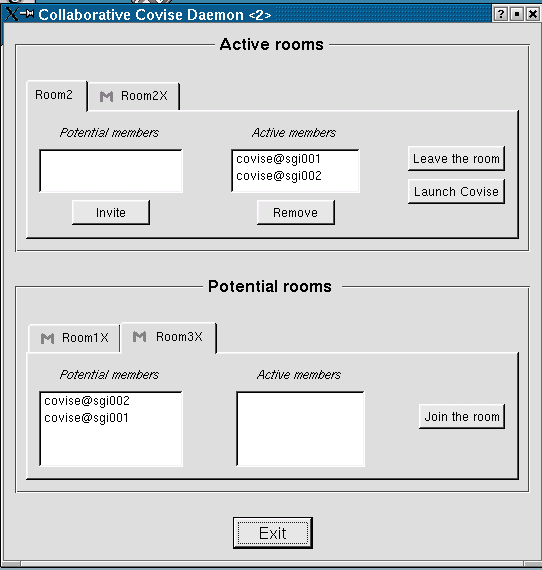
active: Room 2 - Slave: active members covise@sgi001 and covise@sgi002
(Room 2X - Master)
potential: (Room 1X - Master)
Room 3X - Master: potential members covise@sgi002 and covise@sgi001
(see Fig. 5.21)
Figure 5.20:
The following section provides you the necessary information how to use the COVISE Daemon ("covised") as a comfortable and more powerful replacement of the CSCW menu in the MapEditor.
In order to use the COVISE daemon "covised" the following operations are provided:
Please note: This feature is included as a preversion and with draft documentation - use at your own risk!
The web_interface allows a web user to display in his browser the current renderer view from a running covise session. In order to do that execute the following steps:
IMPORTANT:
| Before starting the web_srv, a COVISE session, or stopping the web_srv, the environment variables have to be set using command "source init.www" |
ERROR: bind to port : xxx ...(where xxx is the port number of the HTTP_PORT or COVISE_PORT) the corresponding port (HTTP_PORT or COVISE_PORT) should be changed to a new value. Set the corresponding environment variable to the new value and restart the web_interface.
http://HOSTSRV:HTTP\PORT/ClientApplet.html
tsc_client
| Previous | Next |
| Authors: Martin Aumüller, Ruth Lang, Daniela Rainer, Jürgen Schulze-Döbold, Andreas Werner, Peter Wolf, Uwe Wössner |
| Copyright © 1993-2022 HLRS, 2004-2014 RRZK, 2005-2014 Visenso |
COVISE Version 2021.12
|