|
| Overview | All Modules | Tutorial | User's Guide | Programming Guide |
| Previous | COVISE Online Documentation |
After having read this chapter you will be familiar with:
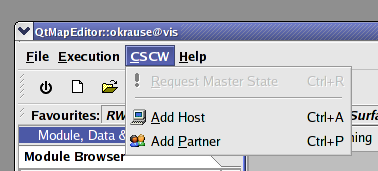
In COVISE it is possible to run modules on remote computers. This is also known as "Distributed Computing". By distributing modules across a network one can make use of remote resources for example of a compute server with more CPUs or memory than on a local workstation or PC. The COVISE session is controlled from the Mapeditor on the local workstation. Remote hosts are included in the session via the menu item CSCW > > AddHost (CSCW = Computer Supported Collaborative Work).
In a multiuser session each participant has it's own Mapeditor and Renderer. The session has to be initiated by one partner who adds the other partners to the session (menu item CSCW > > AddPartner). The initiating partner plays the master role, which means that he has the control over the Mapeditor and the Renderer. If he e.g. changes the camera position in the Renderer all other partner's cameras are synchronised with the master camera. The master role can be exchanged between partners. This way of working together in a multiuser session is also known as "Collaborative Working" where COVISE is regarded as a "Shared Application" which is aware of the sharing.
As the hosts of the partners can also be used for distributed computing COVISE extends far beyond a "Shared Application" such as the ones based on X Windows sharing or a Windows application shared via Netmeeting.
This section provides background information on the COVISE architecture and explains how distributed and collaborative working is implemented.
Distributed Working
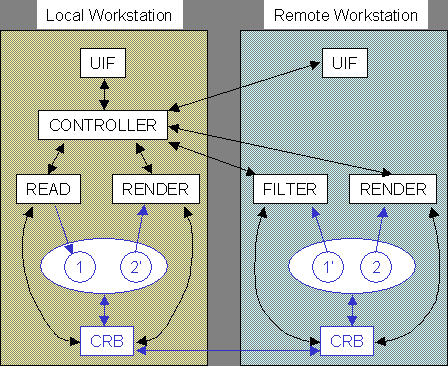
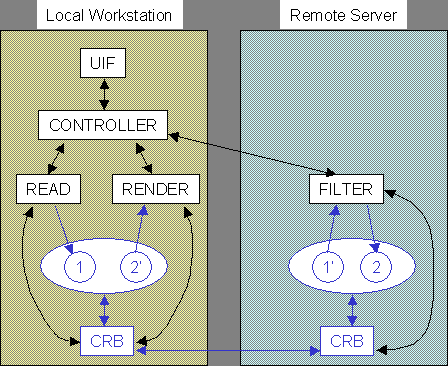
Figure 5.1: Distributed Working
The first process which is started when covise is typed in is the Controller which in turn starts the user interface process (Mapeditor) and the data management process (CRB). As soon as another host is included in the session a CRB is started on that computer. The read module is started on the local workstation, the filter module on the remote computer (see section "Starting a Module on a Remote Computer" later in this chapter) and the renderer on the local workstation. The black arrows between the processes Controller, UIF, CRB and the modules indicate TCP sockets, the blue arrows indicate shared memory access.
When the user executes the pipeline the Controller sends a start message to the read module. The read module reads in the data file and creates a COVISE data object (1) in shared memory and after processing tells the Controller that it has finished. The Controller informs the filter module on the remote computer to start. The filter module asks its data management process (CRB) for the data object (1). As this CRB doesn't have the object it asks the CRB on the workstation for the object and copies it to it's shared memory (1'). The filter module now reads that data object, computes something and puts the data object (2) into shared memory. It then tells the Controller that it has finished. The controller informs the Renderer module to start. The Renderer asks the CRB for object (2) and as this object is not available on the local workstations the CRB transfers it from the compute server into the shared memory of the workstation. Now the renderer can access this object and display the data.
Collaborative Working
In a collaborative session (Figure 5.2) a user interface process (Mapeditor) and a Renderer are started also on the remote machine. The Renderer module is the only module which is started on all computers in a session.
Figure 5.2: Collaborative Working
Every computer that will participate in a distributed or collaborative session should be included in the section HostConfig in the file covise.config. For each host you have to specify the memory model for data exchange between modules on the local machine, the execution mode and a timeout for TCP connections.
HostConfig
{
    # Hostname MemoryModel ExecutionMode Timeout
    vista       shm        rexec       30
    visit       shm        rexec       30
}
For workstations and PCs the memory model is shm which stands for shared memory. There are other memory models like none specifically for machines such as CRAY Y-MP computers.
The execution mode specifies the command which should be used to start the CRB on the remote computer. Possible execution modes are:
For all execution modes besides manual one needs access to the account on the remote computer. For rexec one has to enter the hostname, the user id and the password on the remote machine (similar to logging in on the remote computer using telnet). rsh and ssh can only be used if they allow to log in without password specification (see man rsh and ssh for the files where allowed users are specified). nqs is not recommended, it can be used to put the CRB into a batch queue. Manual means that one has to start the CRB process manually on the remote machine. This can be useful for sessions across a firewall or if one doesn't have access to the remote account. In this case COVISE shows a command in the window where COVISE was started.
The time-out value specifies how many seconds a process will wait to be contacted by a new process that he initiated (e.g. the Controller waiting for a module). The default value is 5 seconds. For slow networks a time-out of 30 seconds is useful. For very slow networks even a higher value is recommended.
As shown in Figure 5.2 COVISE uses TCP sockets for communication with remote hosts. A socket is defined by an IP address, a port number and the protocol (here tcp). COVISE port numbers start by default at 31000. One can configure the start number in the file covise.config using the keyword COVISE_PORT in the section network:
Network
{
    COVISE_PORT     5000
}
For collaborative or distributed sessions across firewalls the firewall has to allow tcp connections to ports in both directions starting with the number defined in covise.config. You need as many ports as modules started during the whole session +3 for distributed sessions or + 4 for collaborative sessions (if you load several maps in a session each map needs new ports). Depending on the execution mode the ports for rexec, rsh or ssh have to be allowed. For the execution mode manual no extra port is required.
Note:
If you use IP forwarding from your firewall to your local computer you have to make additional configurations. Every host that wants to connect to your session has to know that you are behind a firewall and use IP forwarding. Therefore you can tell COVISE not to connect to your machine but to your firewall instead. This is done by adding an IP_ALIAS entry on every client side. Assume your IP is 192.168.0.15 and your firewall has the IP 133.168.226.234 from the outside. Then you have to add
Network {
   IP_ALIAS    192.168.0.15    133.168.226.234
   #           <your IP>       <your firewall IP> =

}
to the config file on every host you want to connect to.
Figure 5.3: Hosts(CSCW) Menu
The window in Figure 5.4 will pop up. First select a hostname or enter a new one.
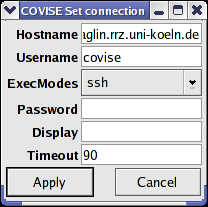
If the selected hostname is available, the window in Figure 5.5 will appear. You can select the parameters for a connection.
Depending on the configuration parameters in covise.config the execution model and the time-out are adjusted. Now one can change the time-out and the execution mode if other values than the standard are required.
For execution mode rexec the user id and password on the remote computer has to be entered. For execution mode rsh or ssh only the user id is needed
Figure 5.4: Host Selection Window.
   start "crb 31005 129.69.29.12 1005" on
   visit.rus.uni-stuttgart.de
Figure 5.5: Set Connection Parameters
crb 31005 129.69.29.12 1005
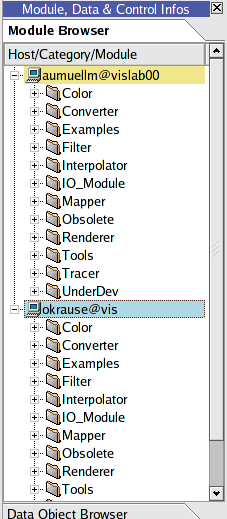
When the remote computer is added successfully the remote username and hostname will appear in the module browser list (see Figure 5.5). Here the option is used that hosts are shown colored.
In a multiuser session (CSCW > > AddPartner) a Mapeditor will pop up on the remote workstation.
Figure 5.6: Remote Computer in the Module Browser
When selecting the remote computer in the hosts list the categories and modules available on this computer will be offered. Clicking on a module it is started on the remote computer. This is indicated by the hostname in front of the module name (Figure 5.7), if the hosts are not colored.
Figure 5.7: Icon for a Remote Module
When a map is saved (menu File > > Save) the information about the hostname is saved, too. When a map is loaded which was saved including remote modules one is asked to add the remote hosts first
CSCW > > AddPartner includes the remote host in the session and starts a Mapeditor on the remote machine. Except for the renderers all other modules are started on the computer which was selected in the hosts list. Renderer modules are started on all workstations.
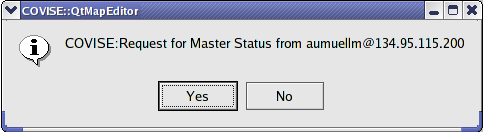
The partner who initiated the session initially has the master role. He can load maps or start modules and connect them. He also controls the renderers. The slave partners can watch all actions of the master but all menu items besides the menu master and interaction in the Mapeditor are deactivated. This is indicated by grey text on the menu buttons and in the modules. The slave partners can request the master role using the menu MasterControl > > Request (or use the corresponing item "MasterRequest" of the Viewer Popup Menu in the Renderer); thereupon a window (Figure 5.8) pops up on the master computer:
Figure 5.8: Master Request Window
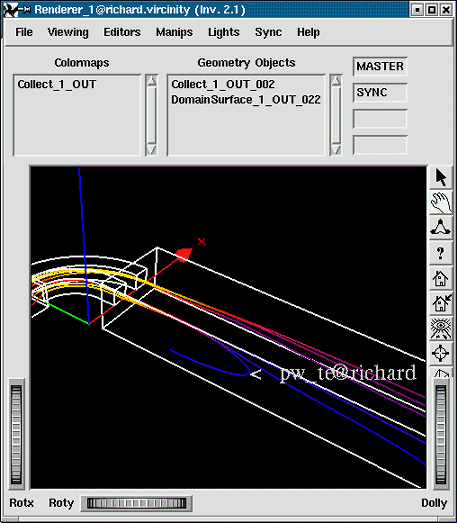
One can make his own mouse pointer visible for the partners by pressing the SHIFT key and moving the mouse. This functionality is called Telepointer. In all remote renderers the originating hostname appears at the position pointed at (Figure 5.9). This also works for Renderer windows having different sizes as the position in 3D space is transmitted and not the 2D pixel coordinates.
Figure 5.9 shows a snapshot from a collaborative session. The user pw_te on host richard.vircinity uses the telepointer to show the other user(s) the backflow zone in a channel.
Figure 5.9: Telepointer in the Renderer
| Previous |
| Authors: Martin Aumüller, Ruth Lang, Daniela Rainer, Jürgen Schulze-Döbold, Andreas Werner, Peter Wolf, Uwe Wössner |
| Copyright © 1993-2022 HLRS, 2004-2014 RRZK, 2005-2014 Visenso |
COVISE Version 2021.12
|